Adding Pictures
Don't be daunted by the size of this page! The purpose of this how to page is to get results long before you reached the half of it. The rest is just optional.
Adding a picture to a wiki requires a few steps. The short, non technical, overview is this:
- Add your picture to the wiki
- Choose the file
- Name the file
- Describe it
- Upload and voila!
- Link to the picture in your story
- Link it..
- Some options.
- Uploading it again! Or.. Uploading a new version.
There is a help page on uploading files, but it's a little daunting for new users.
Uploading a picture
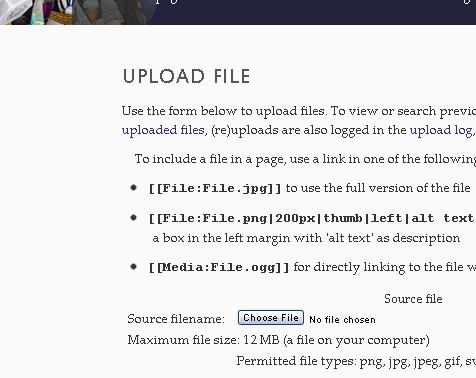
To upload a picture, we have to go to a Special Page, namely the Upload File page. Odd isn't it?
This page should look something like this:

Select the file
The first step is to select the file on your computer. Nothing unusual there, I think.
Name the file
This is a little tricky, but you have to give the file a unique name on the wiki. Should the name already exists, the wiki will give you a warning.
What is important to know:
- The name must be unique
- The name must have an extension that matches the filetype. So if you load a PNG file, give it a ".png" extension.
For example, you could name the file MyAwesomeCharacter.jpeg.
Describe the File
This is optional but recommended. You add a little description of the file's content. For example
- This is my awesome warrior. He's awesome... but that you can see. Mind the little details on his left shoe.
Choose a License
If you don't know.. Pick "I don't know". If you want to see something added, let me know!
Upload it
When you are done, click upload. If there are error messages and warnings, and you feel like you hit a dead end, let me know.
Usually the warnings and errors explain things, but computers aren't always very good on the explaining part.
The File page
If the picture uploaded successfully, you should now see the file's page. It shows the picture, its name, its description et cetera. Take a good look at the link. This page might become important in the future! However, if you use the image somewhere in a story, then that story will automatically offer a link to the image and you don't have to worry about keeping the link manually.
Linking to your awesome new picture
If you managed to upload your file, then you should be seeing a page with a file like "File:MyAwesomeCharacter.jpeg". To add it to your page, you can write:
- [[File:MyAwesomeCharacter.jpeg]]
Yup, that's it. It will link to your picture where you wrote that.
Some options
You can add options to your picture as follows:
- [[File:MyAwesomeCharacter.jpeg|option1|option2|option3]]
I'll go over a few now.
Left, right and text around it
Imagine you want the picture to stand on the right, or left and the text to crawl around it, then simply add the option right, or left like this:
- right
- [[File:MyAwesomeCharacter.jpeg|right]]
- left
- [[File:MyAwesomeCharacter.jpeg|left]]
Border
If you like a little border around it, just write border as an option. Like this,
- [[File:MyAwesomeCharacter.jpeg|border]]
Resizing
If you want a new size, you can set a maximum width or a maximum height.
Maximum width
To add a maximum width, simply add "160px" as option, where 160 is the maximum allowed amount of pixels for the width. Your code would look like this,
- [[File:MyAwesomeCharacter.jpeg|160px]]
Maximum height
A maximum height is a tiny bit more tricky. Just add an x before the describing the maximum size. So add "x160px" as option, where 160 is the maximum allowed amount of pixels for the height. Your code would look like this,
- [[File:MyAwesomeCharacter.jpeg|x160px]]
Updating the picture
Imagine you have filled your story with the awesomeness of pictures all over the place and then you realize you want to change the color of one. Or you want to flip it around... or you just improved the picture a little.
Then you don't need to change the link. You simply need to update the picture. To do this, go to the file page of your picture... or simply click the picture if it is in a story of yours. You should be brought to the file page then.
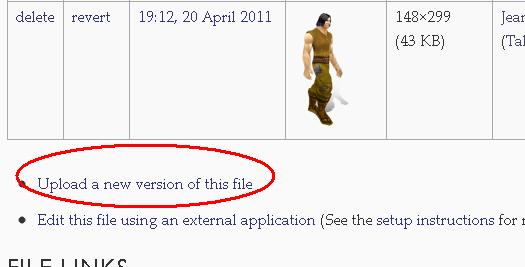
On the filepage you should see a description of the file in a table. Under that table, there is a link upload a new version of this file. It should look something like this,
It will bring you back to the upload form. Some important notes:
- You don't have to give it a new name! In fact, it is not recommended.
- You don't have to describe it. Though it might be convenient to describe why you changed it, or what changed.
When you are done, upload it and voila. All links to your old image are automatically updated to your new image. You don't have to change another thing.
